Re-emerging from the abyss

So, as you have noticed, things have been very quiet on the blog front.  July is, for me, traditionally a month of stress – it is when all the work deadlines for the day job come into conflict, with an added topping this year of trying to get end of year gifts made for the very special women who have helped to look after my little one.  In September she starts school, and so this summer is going to be extra emotional.  Everything I have made doesn’t seem to be enough, or good enough, to recognise what they have done for us as a family.  I said goodbye to the first of my daughter’s current nursery teachers this week.  The only thing I could think to give her was the very first Thank You Shawl I ever made, as it was in her favourite colours, and it was huge.  I hope that every time she puts it on, she feels hugged.

photo 58

So this week should be the beginning of the end of the crazy season, assuming I can get all my work done on time.  One more week and then it is Fibre East (oh my, I cannot wait), which signals the beginning of the end.

Shawl Club continues a-pace, and one of the things I can finally show you is Shawl Number 3, otherwise known as the ‘Forget Me Never’ Shawl.

Two pictures of it – the first one shows it unblocked – highly textured and cosy.  The second shows it blocked (and shows nicely how much blocking can make a project grow.  It is called Forget Me Never, because Sam and I agreed on a pretty forget-me-not colour way for the yarn.  The pictured shawl shows the very subtle first dye of this.  We subsequently decided to ramp up the colour contrasts, so the final yarn colour is a stronger blue, with purple and green accents.

I need to update my archive with this and the previous shawl, but that is a job for the summer months.  I also hope to get some designing done too, so I can launch a new collection of items ready for September, when we all start looking around for ideas for Christmas present makes.  It may not be a very big collection, but it will be exciting for me.  This is all baby steps.  I am still only 3 months into this experiment, and so far it has exceeded my expectations.  I just need to keep all the plates spinning.

And of course, because I don’t know when enough is enough, I asked Phyllis from Rosebuds and Rainbows if she has a DK sock pattern, to help me with my stash busting.  She sent it over – a new pattern for testing – and I used a very special neon yarn by Dye Candy, called ‘Blacklight’, to try it out. As you can see, it makes a very nice (and super quick) winter sock.  Merino cashmere mix.  A treat for the toes.

IMG_0775

The pattern is now up on Ravelry as the ‘Easy Peezy Socks‘.  I am already on my second pair, which I hope to finish to give as a gift to my daughter’s key worker, along with this lazy waves shawlette, which I made on retreat last year.

detail

I am not sure if either the socks or the shawlette will hit the mark, but here’s hoping.

The featured yarn at the top of this post illustrates how I feel – a bit of colour is creeping back into the darkness and not before time.  The yarn is called (perhaps appropriately enough given how crabby I have been on occasion this month) “Kill the Witch”, and it is by  Lollipop Guild Yarns.

Anyway, lots more to follow soon, including some new free patterns, the end of the retro blanket pattern (you thought I had forgotten, didn’t you?), and some more videos as you seemed to enjoy my first foray into video making.  I may even speak in the next one, who knows…!

Advertisement

Thank you…

So, finally I can show you the first shawl club shawl in all its finished glory, and tell you a little bit about it.  First of all, here it is in the shawl club peacock yarn that Unbelieva-wool dyed for me.  And it was exactly as I hoped it would come out. Giddy dancing all around.


It is a similar shape to the Almejas shawl that is in my gallery – that was a pattern from inside crochet and I loved it as soon as I saw it because of the way it wrapped around the shoulders more than a standard triangular shawl did.  When I started trying to come up with my own designs, one of the challenges I set myself was to try to come up with something that had that general shape, but was more accessible and easy to achieve.  I also wanted this first shawl to include as many of my favourite basic stitches as I could.  So there are trebles, granny treble clusters, V-stitches and picots in there, as well as some back loop only work in places, to add to the texture.  There is nothing there that a beginner couldn’t master, and it grows quickly!  It is also deceptive.  One of my pattern testers who was hooking very loosely refused to believe it would use the whole skein of yarn when she was up to about row 25.  Then very quickly the yarn started to disappear!  It is also worth noting that it grows a lot with blocking – it looks quite neat and a little bit frilly after it has been hooked, but once blocked it opens up into a good sized shawl.

I asked for this in a peacock colourway because the shape of the shawl when laid flat reminds me of the shape of the top of a peacock feather.  It also happens to include the favourite colours of Anne Farmer of Ditsy Pips.  I dedicated the pattern to her as a thank you (this is why this is the Thank You shawl on Ravelry). When I was dithering about even starting all this, I had a day where I got myself very confused and convinced that it was going to be too messy and too complex to get into.  Anne talked me through how she set herself up and gave me a lot of very practical advice.  For her it was just a quick set of messages.  What she didn’t realise was how close I was to talking myself out of this before I had even begun, but the fact that she even replied to my message on a day when she had other things to worry about lifted my spirits and changed my mind.  Just knowing that someone who barely knew me didn’t think I was a jumped up idiot for thinking about this was the nudge I needed. I felt that I might be able to earn my stripes and eventually join the yarn army.  The kindness of strangers can be everything on a bad day.

So my other motivation was to create a great big yarny hug. To do this, I started out making this in DK rather than sock, as I also wanted to make a super cosy one (it was winter at the time). One of the shawls I wear a lot at home is a Penelope shawl that I made in King Cole Riot (before the days when hand-dyed yarn entered my life and depleted my bank balance). I wanted to come up with something that made people feel as comforted as I do when I wear that shawl.  So here it is, the first Thank You shawl I ever made, in an Unbelieva-wool DK called ‘new uniform’.  It was the only yarn I had in my stash where I had two skeins of the same colour…

I have been really fortunate to have been helped by two cracking pattern testers who have made sure this first pattern was easy to follow.  One of them sent me this picture of the version they produced, which I love.  Its so hard to find good models, you know…

IMG_2853

Apparently she won’t give up the shawl though.  I think I am going to take that as a bit of a thumbs up.

Granny Blanket: Part 2

Blog followers will know that recently I started to post the instructions for constructing this granny blanket (the ‘knackered granny blanket’!).

Part 1 covered the instructions for making the five granny squares you need to start off with.  Hopefully by now you have your granny squares made and ready for joining.   To join them together, you will need your turquoise blue yarn (if you are following the colour scheme pictured here).

blanket

Reminder: UK Crochet terms are used throughout. TB refers to a Treble Crochet in UK terminology (DC in US terminology).

Special Stitch: TB3tog.  Yarn over hook (YOH), insert hook in space, YOH and pull up a loop, YOH and pull through first two stitches on hook only (2 loops on hook); yarn over hook (YOH), insert hook in space, YOH and pull up a loop, YOH and pull through first two stitches on hook only (3 loops on hook); yarn over hook (YOH), insert hook in space, YOH and pull up a loop, YOH and pull through first two stitches on hook only (4 loops on hook). Finally, YOH and pull yarn through all stitches on hook.

Instructions:

You are going to work along just two sides of your squares only initially, as shown in the picture at the top of this post.

Row 1:

Take your first square, join your turquoise yarn to a corner space, and chain 4.  Next (chain 1 and 3TB) into each of the next seven chain spaces along, which should take you into the next corner space.  Chain 2 and 3TB into that same corner space so that you are turning the corner.  Then (chain 1 and 3TB) into the next SIX chain spaces.  Chain 1.

Into the next space (which should be your next corner space), work a TB3tog, pick up your next square, select a corner to join into, and then also work a TB3tog into that space.

Next (chain 1 and 3TB) into each of the next seven chain spaces along, which should take you into the next corner space.  Chain 2 and 3TB into that same corner space so that you are turning the corner.  Then (chain 1 and 3TB) into the next SIX chain spaces.  Chain 1. Into the next space (which should be your next corner space), work a TB3tog, pick up your next square, select a corner to join into, and then also work a TB3tog into that space.

Next (chain 1 and 3TB) into each of the next seven chain spaces along, which should take you into the next corner space.  Chain 2 and 3TB into that same corner space so that you are turning the corner.  Then (chain 1 and 3TB) into the next SIX chain spaces. Chain 1. Into the next space (which should be your next corner space), work a TB3tog, pick up your next square, select a corner to join into, and then also work a TB3tog into that space.

Next (chain 1 and 3TB) into each of the next seven chain spaces along, which should take you into the next corner space.  Chain 2 and 3TB into that same corner space so that you are turning the corner.  Then (chain 1 and 3TB) into the next SIX chain spaces.  Chain 1. Into the next space (which should be your next corner space), work a TB3tog, pick up your next square, select a corner to join into, and then also work a TB3tog into that space.

Finally, (chain 1 and 3TB) into each of the next seven chain spaces along, which should take you into the next corner space.  Chain 2 and 3TB into that same corner space so that you are turning the corner.  Then (chain 1 and 3TB) into the next SEVEN chain spaces. Turn.

Row 2:

Chain 4. (3TB and chain 1) into the chain spaces in the row just completed until you reach the first corner, where you will need to work (3TB, chain 2, 3TB) to turn that corner. Chain 1, and (3TB and chain 1) SIX times, and then TB3tog twice into the next two chain spaces where the squares meet each other. Chain 1, and (3TB and chain 1) SIX times until you reach the first corner, where you will need to work (3TB, chain 2, 3TB) to turn that corner. Chain 1, and (3TB and chain 1) SIX times, and then TB3tog twice into the next two chain spaces where the squares meet each other. Chain 1, and (3TB and chain 1) SIX times until you reach the first corner, where you will need to work (3TB, chain 2, 3TB) to turn that corner. Chain 1, and (3TB and chain 1) SIX times, and then TB3tog twice into the next two chain spaces where the squares meet each other. Chain 1, and (3TB and chain 1) SIX times until you reach the first corner, where you will need to work (3TB, chain 2, 3TB) to turn that corner. Chain 1, and (3TB and chain 1) SIX times, and then TB3tog twice into the next two chain spaces where the squares meet each other. Chain 1, and (3TB and chain 1) SIX times until you reach the first corner, where you will need to work (3TB, chain 2, 3TB) to turn that corner. Chain 1, and (3TB and chain 1) SEVEN times. Chain 1 and TB into the Chain 3 at the start of the previous blue row.  Turn.

Row 3:

Chain 4. (3TB and chain 1) into the chain spaces in the row just completed until you reach the first corner, where you will need to work (3TB, chain 2, 3TB) to turn that corner. Chain 1, and (3TB and chain 1) SIX times, and then TB3tog twice into the next two chain spaces where the squares meet each other. Chain 1, and (3TB and chain 1) SIX times until you reach the first corner, where you will need to work (3TB, chain 2, 3TB) to turn that corner. Chain 1, and (3TB and chain 1) SIX times, and then TB3tog twice into the next two chain spaces where the squares meet each other. Chain 1, and (3TB and chain 1) SIX times until you reach the first corner, where you will need to work (3TB, chain 2, 3TB) to turn that corner. Chain 1, and (3TB and chain 1) SIX times, and then TB3tog twice into the next two chain spaces where the squares meet each other. Chain 1, and (3TB and chain 1) SIX times until you reach the first corner, where you will need to work (3TB, chain 2, 3TB) to turn that corner. Chain 1, and (3TB and chain 1) SIX times, and then TB3tog twice into the next two chain spaces where the squares meet each other. Chain 1, and (3TB and chain 1) SIX times until you reach the first corner, where you will need to work (3TB, chain 2, 3TB) to turn that corner. Chain 1, and (3TB and chain 1) SEVEN times. Chain 1 and TB into the 3rd chain in the Chain 4 at the start of the previous row.  Turn.

Row 4:

Chain 4. (3TB and chain 1) into the chain spaces in the row just completed until you reach the first corner, where you will need to work (3TB, chain 2, 3TB) to turn that corner. Chain 1, and (3TB and chain 1) SIX times, and then TB3tog twice into the next two chain spaces where the squares meet each other. Chain 1, and (3TB and chain 1) SIX times until you reach the first corner, where you will need to work (3TB, chain 2, 3TB) to turn that corner. Chain 1, and (3TB and chain 1) SIX times, and then TB3tog twice into the next two chain spaces where the squares meet each other. Chain 1, and (3TB and chain 1) SIX times until you reach the first corner, where you will need to work (3TB, chain 2, 3TB) to turn that corner. Chain 1, and (3TB and chain 1) SIX times, and then TB3tog twice into the next two chain spaces where the squares meet each other. Chain 1, and (3TB and chain 1) SIX times until you reach the first corner, where you will need to work (3TB, chain 2, 3TB) to turn that corner. Chain 1, and (3TB and chain 1) SIX times, and then TB3tog twice into the next two chain spaces where the squares meet each other. Chain 1, and (3TB and chain 1) SIX times until you reach the first corner, where you will need to work (3TB, chain 2, 3TB) to turn that corner. Chain 1, and (3TB and chain 1) SEVEN times. Chain 1 and TB into the 3rd chain in the Chain 4 at the start of the previous row.  Break yarn. Change to next colour of yarn in sequence.

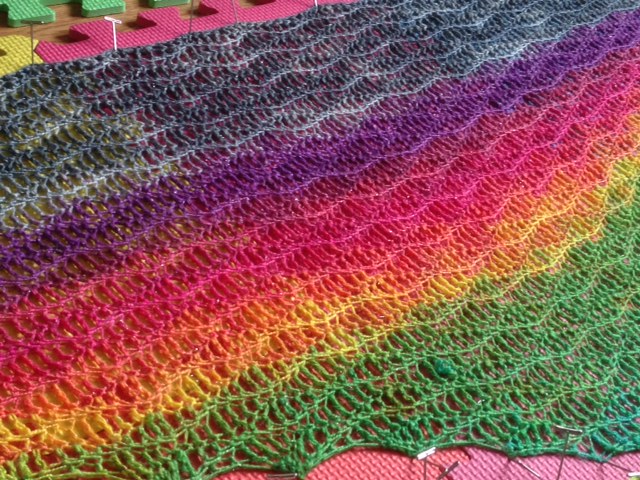
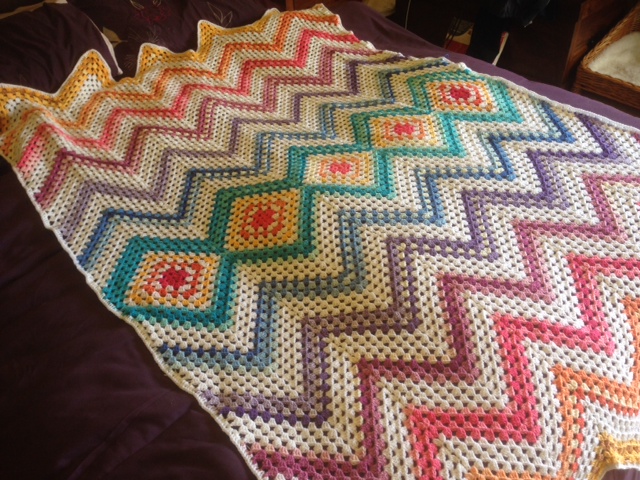
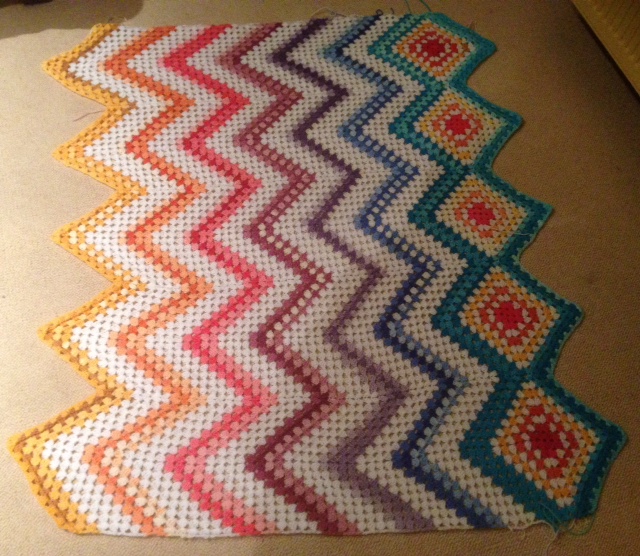
You can now continue the blocks of four stripes until you have a series of stripes as illustrated below:

photo 51

You can see in this picture I have already started to complete the stripes on the other side of the blanket, but you will only have one turquoise stripe in yours at this stage. Once you have got to this point, I will post the instructions on how to complete the other side of the blanket in Part 3.

If you get stuck, leave me a comment and I will be happy to help.


Stashbusting

Some good news!  The other night I sat with my granny blanket and wrote down the instructions for how I engineered it so I could share them with you.  Its a big project, so I am going to split it into three or four parts, and I will even start another one of these (in a different colourway) so I can check my instructions as we go and then I can take pictures to make it a bit easier to follow my instructions. So now is your chance to use this blanket as a good excuse to stash bust!  My next blog will give Part 1 of the instructions – basically how to do the central granny squares, then I will explain how to join them using a granny ripple stripe in Part 2.  The only sewing you have to do with this is sewing in your ends.  It comes up big enough for a single bed, but you could make it double bed sized by adding two or three more granny squares to the width of it.

Anyway, now is the time to dig into your stash to find the following:

100g each of 7 different colours that you want to work with – DK weight yarn.  You don’t have to do a rainbow, but pick a set of shade of the same colour intensity or hue for them to blend nicely. The coloured yarn I used was Ice Magic, which has a nice colour variation within each coloured ball, which kept it interesting during what was quite a big make.  You could use some beautiful hand-dyed yarn for the coloured stripes if you have it in your stash, but remember you will need to find some neutral yarn in the same base for the contrast colour.

On that point, my memory tells me that I also used 6 or 7 100g balls of white acrylic DK on this blanket.  You don’t have to use white of course, as any neural-coloured yarn could work well as long as it sets the colour of your stripes off nicely.

In my stash I have a two boxes of Stylecraft Special DK which is begging to be used up so I will have a rummage tonight to pick my colours, and I will show these off on Instagram when I have picked the ones I want to use.  Use the hashtag #knackeredgrannyblanket on Instagram to show me your choices if you like!  Looking forward to starting this with you all this week.

The link to Part 1 of this make can be found here.